- Understand the cause of damage – Humidity changes, heavy furniture, poor installation, or normal wear can create gaps, chips, and cracks; identifying the cause helps you choose the right repair method.
- Gather the right tools – Laminate repair kits, putty knives, wax sticks, sandpaper, and a clean cloth are essential for effective repairs.
- Repair small gaps properly – Clean the gap, apply color-matched filler, smooth it, let it dry, and buff for a seamless finish; rope-like fillers work for wider gaps.
- Fix chips and minor cracks with care – Use wax sticks or laminate filler, remove excess material, and buff to blend repairs with surrounding planks.
- Replace planks for major cracks – Deep or long cracks require removing the damaged plank, preparing the subfloor, and installing a new plank securely.
- Prevent future damage – Control humidity, use furniture pads, avoid harsh cleaners, install proper underlayment, and maintain regular cleaning to extend the life of your laminate flooring.
Laminate flooring is a popular choice for homeowners because it’s affordable, stylish, and surprisingly durable. But even the toughest laminate can develop gaps, chips, or cracks over time. Whether it’s due to changes in humidity, heavy furniture, or simple wear and tear, these flaws can be an eyesore and even cause more damage if left untreated. The good news? Repairing laminate flooring doesn’t have to be complicated. This guide will cover everything you need to know about how to repair laminate flooring gaps, chips, and cracks.
Why Does Laminate Flooring Get Gaps, Chips, and Cracks?
Before diving into repairs, it helps to understand why these problems happen. Laminate flooring is made of multiple layers: a protective top layer, a decorative layer, a core layer, and a backing layer. Each layer contributes to the durability and stability of your flooring, but environmental factors and wear can still cause damage.
Some common reasons for gaps, chips, and cracks include:
- Humidity and moisture changes – Laminate expands in humid conditions and contracts in dry conditions. This movement can create gaps between planks.
- Heavy furniture or dropped items – Sharp impacts can chip or crack the surface layer.
- Poor installation – Flooring that wasn’t installed with the right expansion gaps or underlayment can shift over time.
- Aging and wear – Over years of use, the laminate’s surface can weaken and become more prone to chips and cracks.
Understanding the cause will help you choose the best repair method and prevent future damage.
Tools and Materials You’ll Need
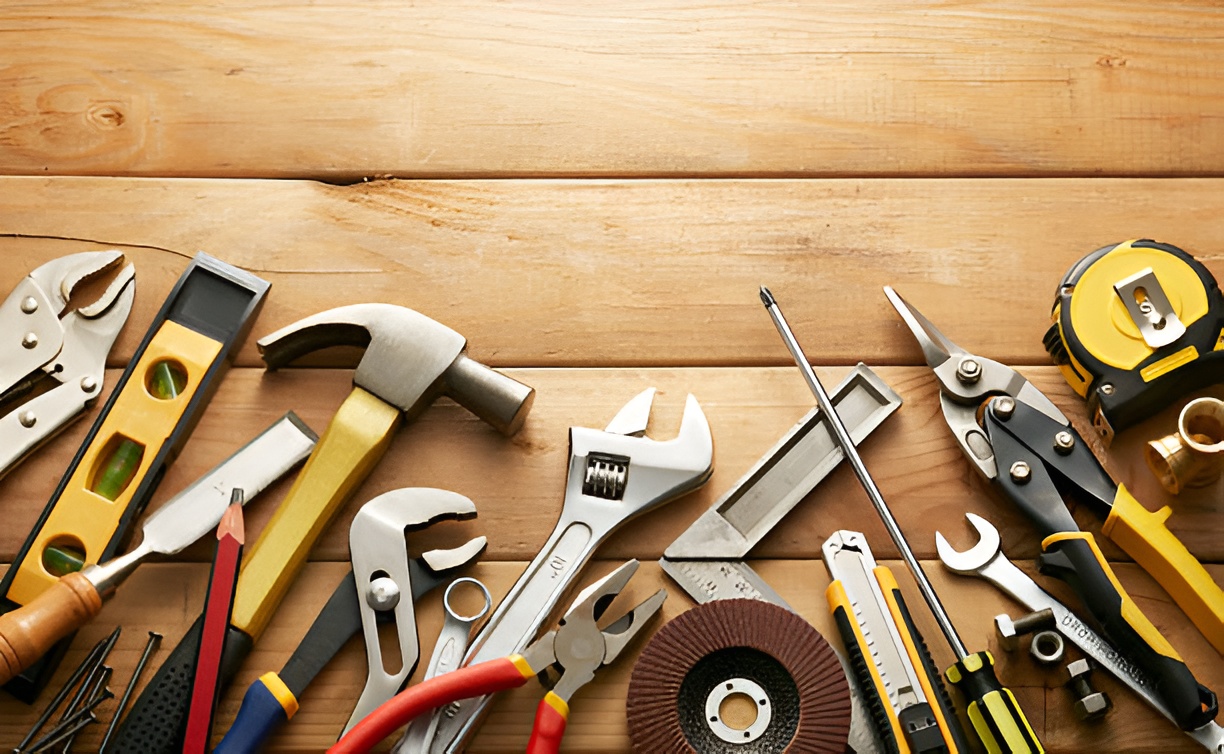
Before starting repairs, gather the right tools and materials. Having everything on hand makes the process much smoother.
You may need:
- Laminate flooring repair kit (commonly includes putty, wax sticks, and color-matching materials)
- Wood filler or laminate-specific filler
- Putty knife or plastic scraper
- Utility knife or razor blade
- Sandpaper (fine grit)
- Rubber mallet
- Hammer and tapping block
- Vacuum or broom (to clean debris)
- Damp cloth (for cleaning before repair)
Some repairs may also require replacement planks, especially for large cracks or deep damage.
How to Repair Small Gaps Between Laminate Planks
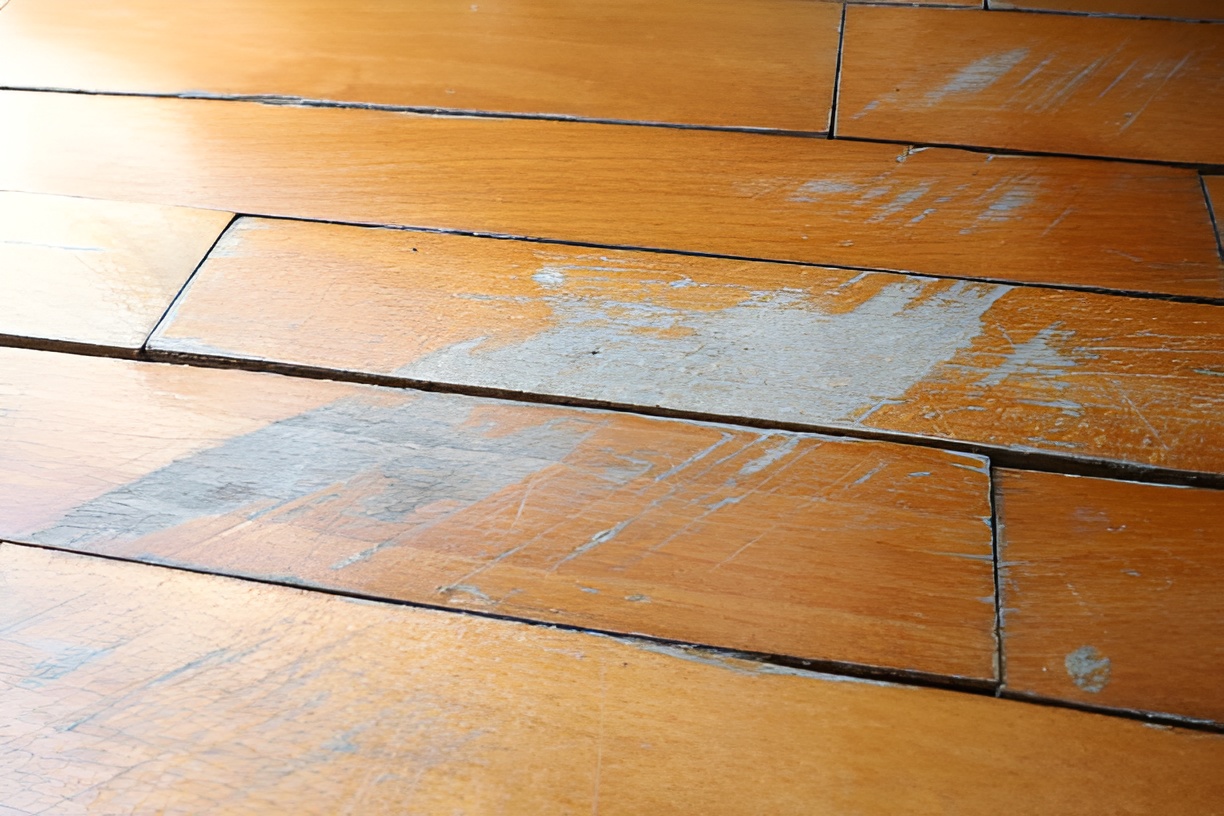
Small gaps are common in older laminate floors or floors installed without proper expansion space. They can occur due to seasonal changes, shifting subfloors, or normal wear over time.
Here’s a detailed step-by-step method to fix them:
- Clean the gap thoroughly – Use a vacuum or a small broom to remove all dirt, dust, and debris. For narrow gaps, a soft brush or compressed air can help dislodge particles. A clean surface ensures the filler adheres properly and the repair looks smooth.
- Select the right laminate filler – Choose a color that closely matches your flooring. Most home improvement stores sell laminate filler or putty sticks in a variety of shades. A good color match will make the repair nearly invisible.
- Apply the filler carefully – Press the filler into the gap using a putty knife, pushing it down to reach the bottom of the space. Avoid overfilling, which can create a raised line along the floor. For deeper gaps, you may need to apply the filler in layers, letting each layer set slightly before adding more.
- Smooth and level the surface – Use the putty knife to scrape away any excess filler so it’s flush with the floor surface. Pay attention to the edges of the planks to ensure a seamless finish.
- Let the filler dry completely – Follow the manufacturer’s instructions for drying time, typically 30–60 minutes. Avoid walking on the area during this period to prevent smudging.
- Buff and blend the area – Use a soft cloth to gently blend the filler with the surrounding planks. Some fillers benefit from a slight polishing to restore shine and create a uniform look.
Optional for wider gaps: Rope-like floor gap fillers can also be pressed into larger spaces. These flexible fillers expand slightly to fill the gap and create a long-lasting solution without compromising the floor’s appearance.
How to Repair Chips on Laminate Flooring
Chips are small, localized damages on the surface of laminate planks. While they may seem minor, they can stand out visually and, if ignored, lead to further cracking or peeling. Repairing chips is straightforward with the right tools.
- Clean the chipped area – Wipe the chip and surrounding area with a damp cloth to remove dust, dirt, and debris. Make sure the area is dry before applying any filler or wax. A clean surface ensures better adhesion.
- Choose a matching repair color – Laminate repair kits often include multiple shades. Select one that best matches your flooring, or mix colors if necessary to get the closest match.
- Apply wax stick or laminate filler – Rub the wax stick over the chipped area, pressing it gently into the depression. If using a putty-style filler, apply it with a putty knife and make sure it fills the chip fully.
- Remove excess material – Scrape off any surplus wax or filler using the putty knife. The goal is to make the repaired area level with the rest of the plank. Overfilling can leave bumps that are noticeable underfoot.
- Buff and blend – Use a soft cloth to polish the area, blending the filler or wax with the surrounding laminate. This step helps to reduce any color differences and restores a smooth finish.
For larger chips: Combine wood filler with touch-up markers to recreate the floor’s texture and color. This technique is ideal for chips larger than a dime or for areas where the decorative layer has been damaged.
How to Repair Cracks in Laminate Flooring
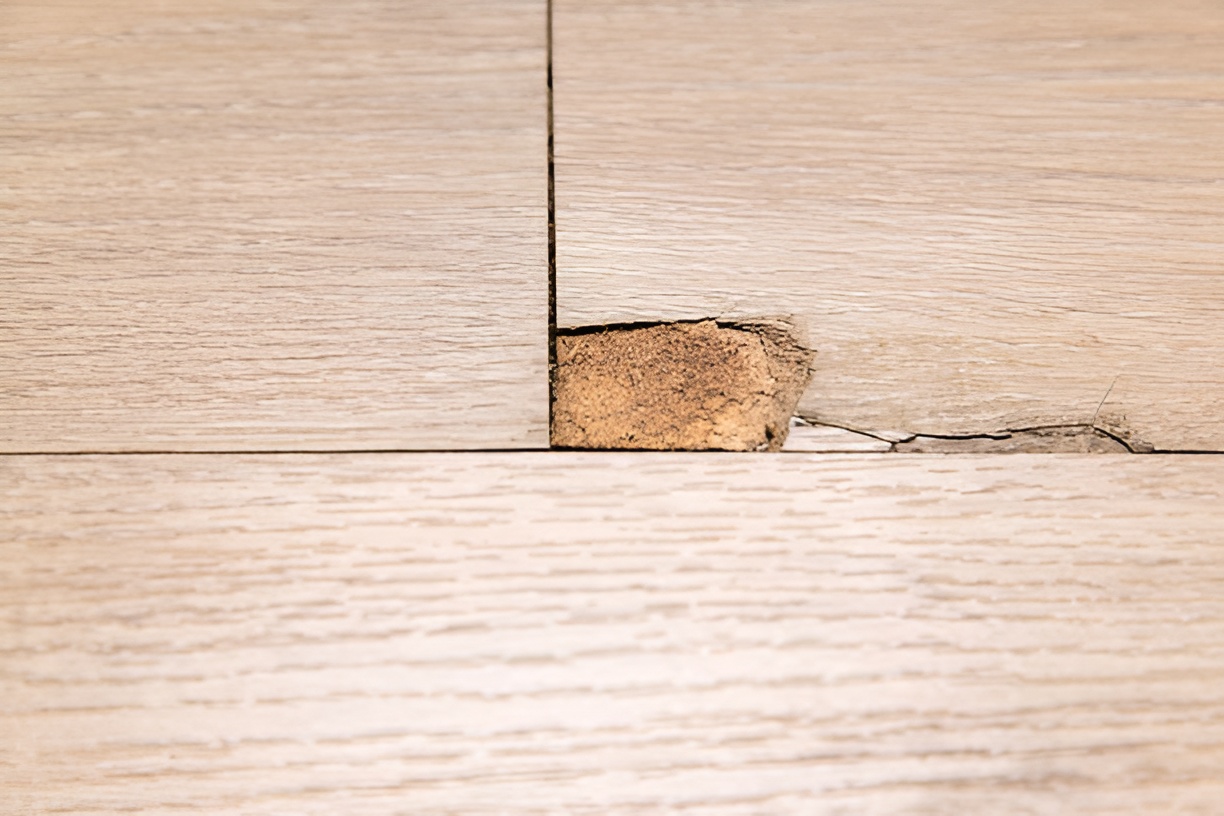
Cracks are deeper than chips and can compromise the integrity of a laminate plank. How you repair a crack depends on its size and severity. Minor cracks can often be repaired with filler, while major cracks may require plank replacement.
Minor Crack Repair
- Clean the cracked area – Remove dust, dirt, and debris using a damp cloth. If the crack is narrow, use a soft brush or compressed air to clean out particles.
- Apply laminate filler or wood putty – Select a color that matches your flooring. Press the filler carefully into the crack using a putty knife, ensuring the crack is fully filled.
- Smooth the surface – Level the filler with the putty knife and remove any excess. This prevents bumps and helps the repair blend naturally.
- Allow to dry completely – Drying time varies by product, but it is crucial to allow full curing before walking on the repaired area. This ensures durability.
- Sand lightly – Use fine-grit sandpaper to smooth any rough edges. Sanding helps the repair blend seamlessly with the surrounding laminate and restores a uniform finish.
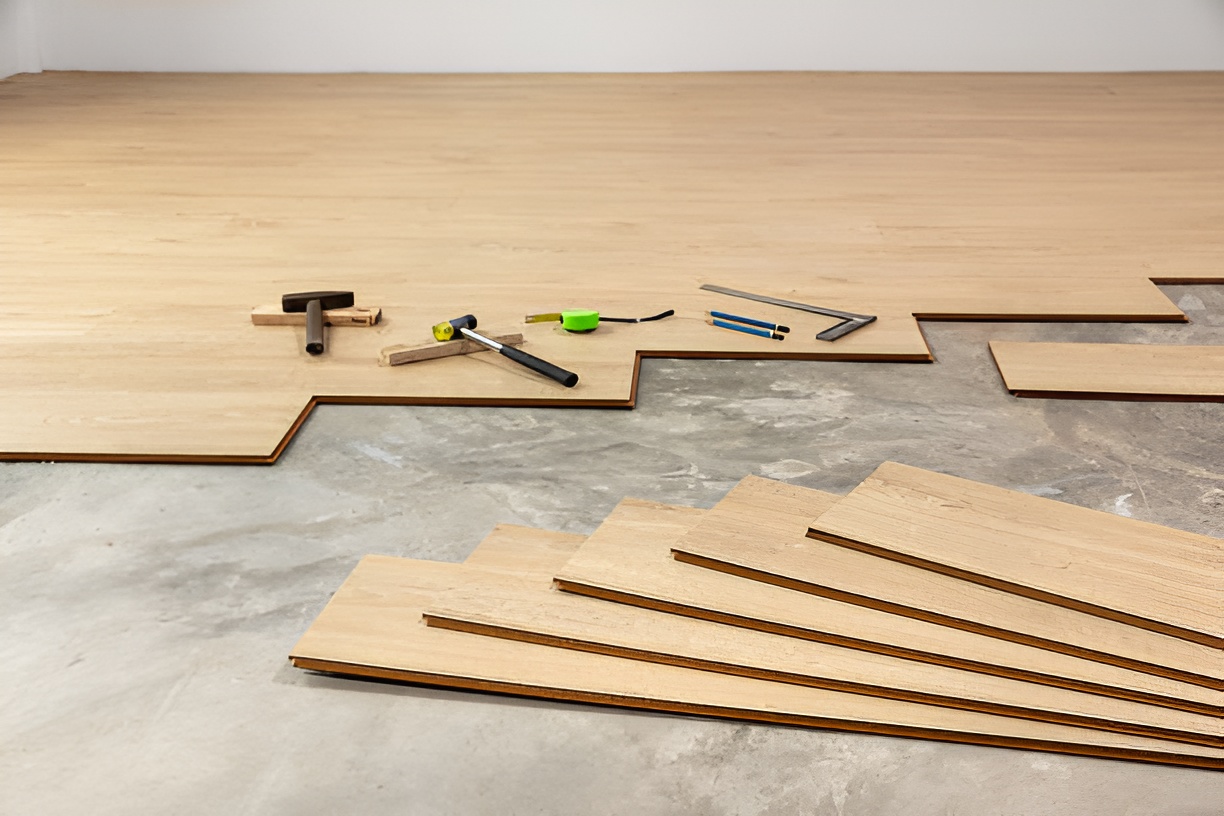
Major Crack Repair
For cracks that run the length of a plank or are too deep for filler, plank replacement is the best option.
- Remove the damaged plank – Carefully unlock the plank from the tongue-and-groove system. Take care not to damage surrounding planks.
- Clean the subfloor – Remove any debris or adhesive residue to ensure the new plank sits properly.
- Install the replacement plank – Fit the new plank into place, aligning it carefully with the surrounding flooring.
- Secure with a tapping block – Gently tap the plank into place using a rubber mallet and tapping block. Avoid excessive force, which can crack the new plank.
Replacing planks requires a little more effort, but it ensures the repair is durable and maintains the floor’s overall integrity.
Tips for Preventing Future Gaps, Chips, and Cracks
Repairing your laminate is only part of the solution. Preventing damage ensures your flooring lasts longer.
- Control humidity – Use a humidifier in dry months and a dehumidifier in humid seasons.
- Use furniture pads – Prevent dents and chips from chairs, tables, and heavy furniture.
- Avoid harsh cleaners – Stick to laminate-safe cleaning solutions.
- Install proper underlayment – Helps absorb shock and reduces plank movement.
- Regular maintenance – Sweep and mop gently to avoid scratching the surface.
These small steps can save you time and money by reducing the need for frequent repairs.
Can You Repair Laminate Flooring Yourself?
Absolutely. Most gaps, chips, and minor cracks can be repaired with basic tools and a little patience. Laminate repair kits make the process straightforward, and online tutorials can guide you step by step.
However, if you’re dealing with:
- Widespread water damage
- Large cracks affecting multiple planks
- Warped or buckled flooring
…It’s often worth consulting a professional to avoid making the problem worse.
How Much Does It Cost to Repair Laminate Flooring?
The cost varies depending on the type of damage:
- Minor chips or cracks – $5–$20 for a repair kit.
- Small gaps – $10–$30 for fillers or gap sticks.
- Plank replacement – $30–$100 depending on flooring quality and whether you hire a professional.
DIY repairs are usually inexpensive, but replacement and professional services will cost more. Think of it as an investment in your home’s appearance and longevity.
Common Mistakes to Avoid When Repairing Laminate Flooring
Repairing laminate sounds simple, but there are common pitfalls:
- Using the wrong filler color – Even slight mismatches are noticeable.
- Skipping surface cleaning – Dirt prevents filler from bonding properly.
- Applying too much filler – Can cause bumps or an uneven surface.
- Ignoring the cause – If humidity or heavy furniture caused the damage, it will likely return.
- Forcing planks – Don’t pry or bend the laminate aggressively; it can crack further.
Avoiding these mistakes ensures your repair lasts longer and looks better.
Can Laminate Flooring Be Fully Restored?
While repairs can fix cosmetic and minor structural damage, laminate can’t be completely restored to “brand new” condition in all cases. Surface scratches and minor cracks can blend in, but deep damage, warping, or widespread gaps may require partial replacement. The key is regular maintenance and timely repairs to extend the life of your flooring.
Wrapping It Up
Laminate flooring is a beautiful and practical choice, but it isn’t immune to wear and tear. The good news is that with a little knowledge and the right tools, you can tackle gaps, chips, and cracks yourself.
Remember:
- Identify the cause of the damage first.
- Use color-matched fillers and wax sticks for small repairs.
- Replace planks for serious cracks or damage.
- Take preventive measures to reduce future problems.
With these tips, your laminate flooring can stay smooth, seamless, and attractive for years to come. Proper care and timely repair will not only maintain your floor’s appearance but also protect your home’s overall value.